Reviews
Guide To Choosing The Best VR Headset

You’re about to take the plunge in virtual reality (VR). You see how much fun your friend is having playing with his Oculus Rift. Your Galaxy S7 toting friends are showing off their Gear VR. You’ve played with an HTC Vive in the store, and now you are ready to get into VR. How exactly do you do that? What VR platform should you invest in? Virtual reality broke out in a big way in 2016 with big names such as Sony and Facebook (via Oculus) releasing VR headsets for the masses.
While virtual reality isn’t new by any means (the first VR headset was built in 1968), 2016 was the year that VR truly broke out into the mainstream. Cheap VR headsets can now be found in several big box stores and even grocery stores such as Wegmans. Despite the coming out party for VR, it’s still very much an early adopters market. How the rest of the market responds to VR in the long term remains to be seen since we’re still on the first versions of current VR headsets. With that said, here are the top VR headsets to look at:
Oculus Rift

Starting out this list is the Oculus Rift. The Rift started out as the brainchild of Oculus founder Palmer Luckey and id Software cofounder John Carmack. After Luckey created a Kickstarter for the Rift back in 2012, it quickly became the darling of the gaming industry and raised upwards of $2.5 million. The Rift has gone through several iterations starting with the Development Kit 1 or DK1. Each successive iteration of the Rift improved on the specs dramatically such as screen resolution, refresh rate, and frame rate.
In 2014, Oculus was bought by Facebook for $2 billion. The influx of cash from Facebook allowed Oculus to finish development of the Rift and it finally went on sale on March 28, 2016 for $600. Oculus formed a partnership with Microsoft to allow Rift games to be played natively with the Xbox One controller (which was also packaged in with the Rift headset). Initial reviews of the Rift were overwhelmingly positive with many reviewers praising the comfort of the headset and truly high end graphics that don’t compromise.
The major drawback was the lack of the Oculus Touch controllers at launch. The Oculus Touch Controllers free the user’s hands and allow more immersive VR experiences. The Touch controllers were later released in early December. The Touch Controllers connect to the Rift via Bluetooth thereby freeing up a USB port. However, even with the two cameras, the tracking may occasionally go out.
The solution is to buy a 3rd camera sensor which eats up another USB port and costs $80. Unfortunately, in order to render the detail required of Rift in a manner that doesn’t make the user nauseous, a PC with a high-end graphics card was required (NVIDIA GTX 970 or AMD Radeon R9 290).
In October 2016, Oculus lowered the system requirements a little by adopting the “motion interpolation” technology which allows games to run at lower frame rates. This would also allow cheaper computers with lower specs to run VR games on the Rift. That said, computers that can run VR games comfortably still cost around $600-700 not to mention the cost of the Rift itself.
HTC Vive
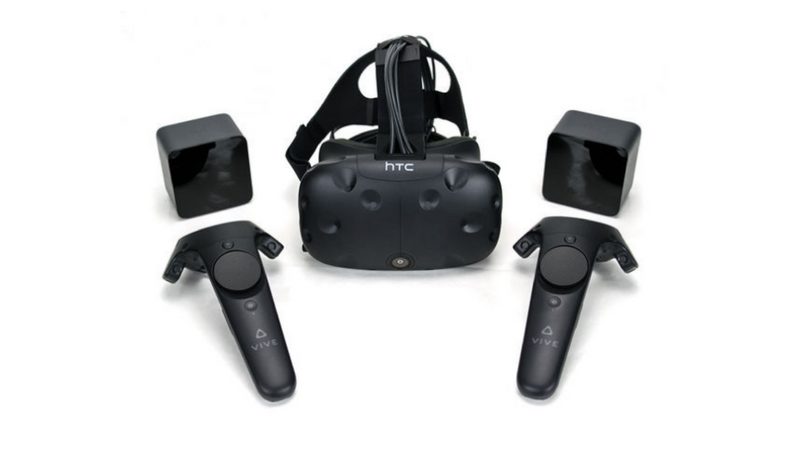
Up until March 2015, HTC was primarily known as a smartphone maker. The Taiwan based company unveiled the Vive at Mobile World Congress on March 2015 as a collaboration with gaming company Valve. HTC engineered the actual VR headset while Valve created SteamVR operating system for use on the Vive. The Vive was designed as a whole room experience from the beginning.
It utilizes two IR cameras placed on opposite sides of the room as well as two motion controllers to allow full movement in a VR environment. Up until the release of the Oculus Touch Controllers for the Rift, the HTC Vive was the only one allowing full room scale VR.
Most early VR games for the Rift were created for traditional couch gaming using the Xbox One controller, just with the added benefit of VR head tracking. In order to prevent users from bumping into the wall or furniture, the Vive has a feature called Chaperone which actually shows a cool “Tron” view of the real world using the built-in camera on the front once the user gets too close to an obstacle.
Reviews for the Vive were also favorable with many lauding the complete immersion offered by the motion controllers. Unfortunately, some reviewers complained how bulky and uncomfortable the Vive headset was compared to the Rift.
Additionally, be prepared to set aside about 15-20 minutes setting up the play space if you want the full room-scale games. The Room-Scale mode requires you to place the IR cameras (called Lighthouses) on opposite sides of the room. The space requirement can be as small as 6.5ft by 5ft or as large as 15ft by 15ft.
Fortunately, there is a Standing-Only setting that allows you to use the Vive in tighter spaces. Like the Rift however, all of that VR goodness doesn’t come cheap.
In fact, the HTC Vive retails for about $800, a good $200 more expensive than the base Oculus Rift. That’s also not factoring in the cost of the high-end computer needed to render the VR graphics on the Vive.
PlayStation VR

Not to be left in the dust, Sony released their PlayStation VR (PSVR) on October 13, 2016. Unlike the HTC Vive and the Oculus Rift, the PSVR was designed to be connected to the PlayStation 4 console instead of a PC. The PSVR is meant to be a more affordable entry into the VR space as most people who purchase it will probably already own a PS4. Also, the price the PSVR itself is only $400.
The complete system consists of the headset itself, a processor box to output video to the TV and 3D audio, the PS camera, and two PlayStation Move controllers. Some readers may recognize the Move controllers from Sony’s previous foray into motion controllers to compete with the Nintendo Wii.
The main drawbacks to the PSVR is that it’s not quite as powerful as the Rift or the Vive. The PS4 is much weaker than high end gaming computers and thus the PSVR is limited to 1080p resolution. While 1080p is crisp from a distance, the pixels can be seen when viewed up close.
Also, while the Move controllers are a welcome addition and do provide more immersion than a PS4 DualShock controller, the limited viewing angle of the camera can cause the loss of tracking of the Move controllers. While the setup doesn’t require you to place cameras everywhere, the plethora of cords can be a real pain. Regardless, for the price, the PSVR remains a solid entry into the VR market.
Google Daydream View
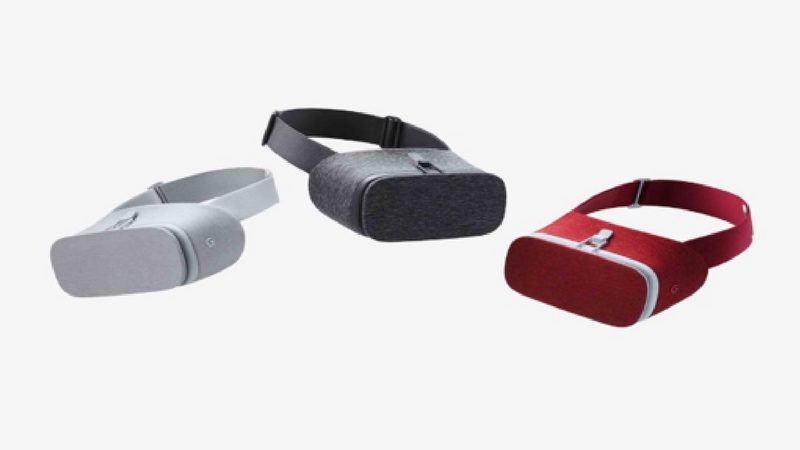
Google’s Daydream View headset utilize smartphones to provide the VR experience. Before Daydream, there was Google Cardboard. It’s literally what you think it is: a cardboard box with two lenses inside that had a slot for sliding in a smartphone. Google wanted a cheap and easy way for people to experience VR for themselves.
Google also positioned Cardboard for education and schools. Teachers could use Cardboard in the classroom for more immersive learning experiences. Unfortunately, VR on phones was still a budding concept and experiences, while novel, were not the best.
To remedy that, Google unveiled the Daydream VR platform and Daydream View headset alongside the Pixel smartphone on October 4, 2016. Initially designed just for the Pixel, Daydream View is a small VR headset made of fabric that has an opening for the Pixel.
It also came with a simple motion controller for pointing and interacting with virtual objects. Nothing as fancy as the Rift and Vive or even the PSVR Move controllers but for affordable VR, it gets the job done. Google is leveraging the Daydream VR platform on Android to allow developers to easily create VR experience for Android based devices such as smartphones.
Samsung Gear VR
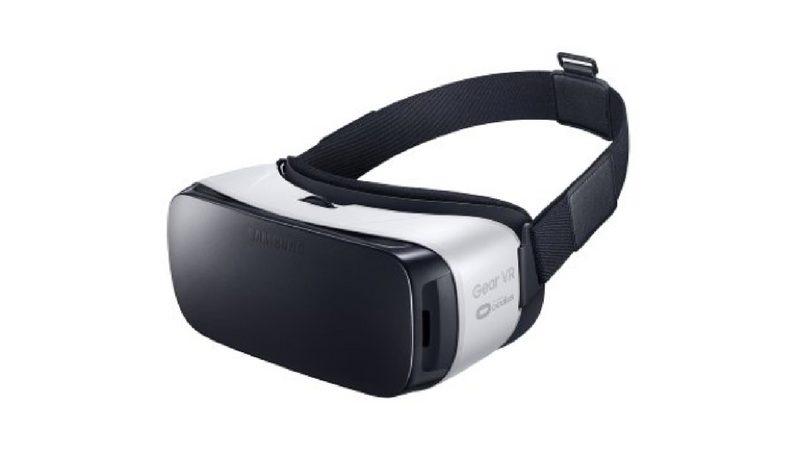
Samsung also stepped into the virtual reality ring with its Gear VR. The Gear VR was originally released in November 2015 for use with Samsung’s flagship smartphones such as the Galaxy S6/S7. It was developed with input from Oculus and provides a cheaper alternative to high end VR headsets.
The first edition of the Gear VR was released to developers in December 2014 and only worked with the Galaxy Note 4. Technically, consumers could buy it as well but it was marketed towards developers so they could get a handle on the technology in order to create applications for it.
There are currently around 185 applications for the Gear VR. In fact, Six Flags Magic Mountain partnered with Samsung to create the first roller coaster with VR in North America.
So which VR headset should you pick? That question largely hinges on what your bank account is looking like. If you own a gaming PC with a relatively newer graphics card then go for the HTC Vive or Oculus Rift. Both offer uncompromised VR experiences allowing you to fully utilize a room. Because of the high-end graphics and resolution, there’s much less chance of feelings of nausea or motion sickness.
If you own a PS4 and don’t want to shell out for a high end gaming PC, then the PSVR would make a better bet. While the screen resolution isn’t as high as the Vive/Rift, it’s not so distracting that it takes away from the experience. Plus, because the PS4 already has a huge install base, game developers are more likely to create games for it.
On the downside, the Rift, Vive, and PSVR all suffer from a copious amount of cables that must be managed. If you don’t own a PS4 or high end gaming PC (or maybe you just don’t want to shell out $400 for PSVR), the Samsung Gear VR or Google Daydream View are viable options especially if you own a Samsung or Google phone.
In fact, most people will probably use these as stepping stones into the world of VR. However, the VR experiences on these devices still pale in comparison to the higher end VR headsets, not to mention significantly eating into battery life on the smartphone. If you’re interested in the Daydream View but don’t own a Pixel, don’t fret.
Google announced that companies such as Samsung (ironically), HTC, LG, Alcatel, Xiaomi, Huawei, ZTE, and Asus will all create Daydream ready smartphones.


Are you tired of keeping up with long email chains or trying to sync everyone in the team for a live call? If you answered yes, then Loom could be an efficient tool for you. In this Loom review, we’ll unpack how you can use Loom to explain complex ideas, give feedback, or walk someone through a task without going on a live call.
We’ll also explore its standout features, use cases, pricing plans, and how it compares to Zoom so you can decide if it fits your team’s workflow.
What is Loom?

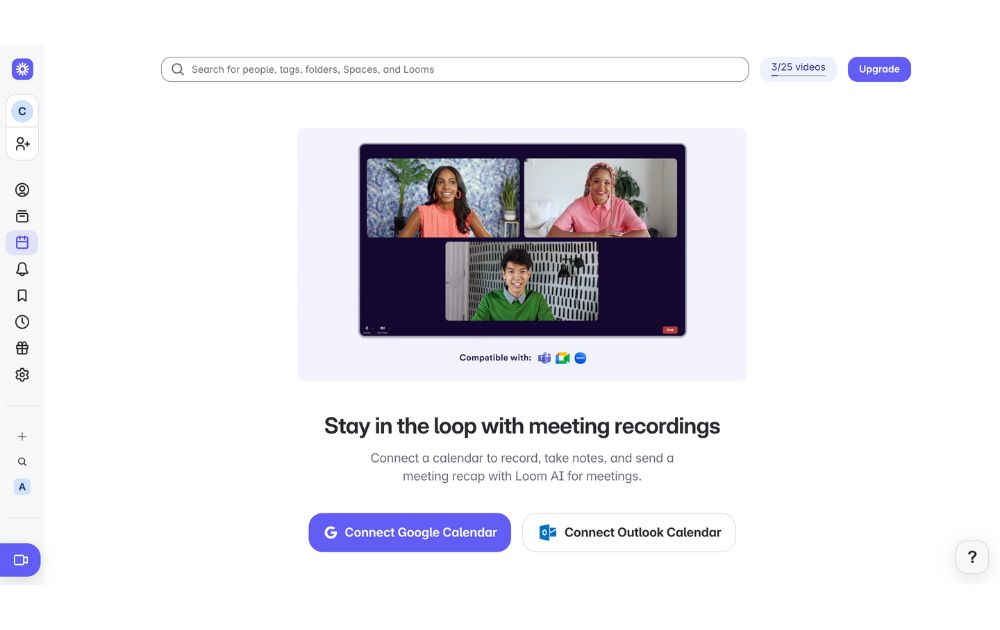
Loom is a video messaging app that lets users record and share video messages with teammates and clients. Using Loom, you can record your camera, microphone, and desktop screen at the same time.
According to online Loom review, this is especially useful for individuals to create tutorials, demonstrations, and presentations, as well as to share feedback.
Loom users can choose to record with the Loom Chrome extension, the desktop app, as well as the iOS and Android apps.
Some of Loom’s clients include Brex, Intercom, Postclick, and more.
Loom Features

Loom has various features that allow it to seamlessly integrate into a company’s existing workflows.
Users can play Loom download videos within platforms like:
- Slack
- Jira
- Confluence
- Github
Why does this matter? Users will no longer be led to an external link, increasing their productivity by playing feedback videos within the platform.
Next, Loom video has an AI suite that can help teams work more efficiently. Using AI, the tool can:
- Automatically generate meeting notes and recaps, among other things
- Instantly create chapters in your videos, as well as CTAs and tasks
- Create text transcription and generate closed captions

To refine your videos further, Loom has features that can remove filler words and silence in a video.
Besides this, Loom also has a video-to-text feature. This is especially useful for asynchronous teams that need help with logging a bug issue, documenting a process, or performing a code review.
Loom Pricing
Loom pricing is generally straightforward. If you want to know if Loom is free, yes, it does have a free tier.

It has a free Starter plan for users who want to try out the app’s key features. It can accommodate up to 50 Workspace users, who are each entitled to up to 25 videos with a five-minute length cap.
Next, the Business plan is for teams that want unlimited videos and basic editing. It costs $15 per user per month if billed annually. Here, you can have unlimited members get basic waveform editing, remove the Loom Branding, and more.
According to Loom review, their most popular plan is the Business + AI plan, where teams can get advanced editing and access their AI suite. This plan costs $20 per user per month if billed annually.
Their premium plan is the Enterprise plan, which is best for companies that want to control and securely manage video content for the organization. If you’re wondering, “Is Loom safe to use?” This plan has advanced security and content privacy features as well as admin insights. Teams need to contact Loom’s sales team first to get a price quote.
Finally, Loom has a discount plan for educators as part of the Atlassian Education Program.
Use Case Breakdown
Here are a few Loom use cases:
- Loom review can be especially helpful for tech teams, as it can be used to narrate a bug issue. When an issue occurs, developers or testers can simply record the issue with Loom and report the issue to the concerned developers. It saves time and increases the turnaround time for bug fixes.
- Hiring teams and internal teams can also use Loom to document an internal process for onboarding purposes. Apart from this, it can also be used by customer-facing teams to create user guides on a platform or a new product feature.
- Sales teams can also use Loom to reach out to prospective clients. When cold emails are not friendly enough, sales teams can create personalized video content through Loom and stand out.
- Taking too long to get feedback from all stakeholders? Loom is great for product design teams to get asynchronous feedback from a global executive team. It’s great for instances where it’s difficult to get stakeholders in one meeting.
- Finally, Loom is great for educators and academics who want to create videos for remote classes.
Loom vs. Zoom
While their names sound the same, Loom and Zoom have different fundamental use cases. In terms of Loom review, Loom is best used to record and send videos, which can be used for demos, tutorials, and feedback. In terms of use cases, Loom is more catered to asynchronous communication and screen recordings.

Meanwhile, Zoom is best used for hosting live meetings and large conferences. It has features like breakout rooms and virtual backgrounds. While you can use Zoom to record videos yourself, Loom is more optimized to share video links with teammates and clients.
Final Thoughts: Who Will Get the Most Out of Loom?
Loom is best for companies that need videos for their day-to-day work communication. Whether for external or internal communication, it is great for clients who work asynchronously. In fact, most of their clients include those in the tech and product space.
Their product is useful for tech, sales, and product design teams that need to align with cross-functional teams. Loom is also best for companies that want to tighten their internal feedback loop, demonstrate processes, and get quick updates.

Educators, coaches, and course creators can also benefit from Loom’s features. The platform makes it easy to create clear, engaging instructional videos that students or clients can watch at their own pace. With features like closed captioning, video chapters, and transcription, Loom helps streamline learning and knowledge sharing.
Finally, to sum up this Loom review, freelancers and consultants who want to build stronger relationships with clients may also find Loom useful. Just like gadgets that boost team connectivity, like the Deeper Connect Pico, the global workforce can benefit a lot from Loom. Personalized video updates, walkthroughs, or proposals can set them apart, adding a human touch to digital communication that static emails or text-based reports often lack.
Entertainment
On The Count Of Three Review
A past-due calling card for actor-director Jerrod Carmichael

WARNING: This review, and this film, contain discussions of suicide.
A Dark Premise, A Wobbly Execution
“On the Count of Three” opens with a bold premise: two childhood friends make a suicide pact and spend their last day on Earth tying up loose ends. It’s certainly fresh, but what makes “On the Count of Three” feel oddly stale despite its originality?
It’s not that we’ve seen too many comedies about suicide before. It does, I suppose, bear some resemblance to other race-against-the-clock (Good Time) or apocalyptic (Seeking a Friend for the End of the World) comedies. Maybe it doesn’t commit to darkness as much as these comedies; there’s certainly a humanist core deep down here.
But I think we all sort of know why this movie can’t fully work in 2022: it’s a movie Jerrod Carmichael made in 2020. The director and star has seen a long-overdue rise to stardom in these past months after a series of false starts. He’d already had a breakout role in a hit comedy, a sitcom starring vehicle, a special directed by Spike Lee, and a recurring feature on 2019’s biggest album.
Last month, the stars finally aligned. He came out as gay, dropped a smash-hit comedy special, and hosted SNL all in the span of a week. It’s no surprise that Annapurna Pictures quickly moved to release On the Count of Three, which they picked up at Sundance in January 2021.

Here’s the rub: On the Count of Three lacks the self-assuredness of Carmichael’s recent rise. It doesn’t feel like the film, or the version of this film, that he would’ve made today. His performance as both actor and director is good, but held to a certain restriction.
Two Leads, One Day, A Lot of Pain
Carmichael plays Val, a down-on-his-luck laborer who ventures to commit suicide with the help of his recently-hospitalized friend Kevin (Christopher Abbott).
While there’s a certain comical bleakness to Val’s life—he essentially shovels dirt for a living—there’s an interesting idea of suicidal ideation here. Val’s thoughts of killing himself don’t come from stagnation or trauma, but from dissatisfaction with achievement. He makes his first attempt right after getting a promotion, and we later learn that he had planned to propose to his now-pregnant partner, Natasha (Tiffany Haddish).
As director, Carmichael wisely avoids eating up the film and splits lead duties with Abbott. If anything, Abbott gets the real star showcase here, again proving his dynamic magnetism after a series of weirdo indie turns like Vox Lux, Possessor, and Black Bear.
The Black Comedy Balancing Act
Still, there’s a classic comedic duo chemistry here. Carmichael is the rock around which Abbott orbits. The setup also gives them plenty of opportunities to subvert that dynamic. When Val’s confrontation with his father (J.B. Smoove) gets heated, Kevin has to be the one to pull him back. But, when they come to blows, Kevin’s the one with the tire iron.

Black comedy is always a tricky balancing act. Penn and Teller Get Killed is notorious for going all-in on nihilism and failing to connect. I think this film mostly succeeds, but its uncertainty with its own dark philosophy is, again, reflective of a more self-conscious point in Carmichael’s career.
Bleak, But Also Soft Around the Edges
In Kevin’s first scene, he delivers a monologue about how doctors have been trying to fix him since he was eight years old, and if his life was worth saving, they’d have done it by now. Much of the film follows Kevin’s quest to kill a childhood doctor who molested him (played by Henry Winkler). Ultimately, it’s Val who pulls the trigger, but only after he decides to choose life. His decision to choose life only comes after a guilt trip from Natasha, who lays out how he’ll still be guilty in death if he abdicates his responsibility as a father.
All of which is to say, this is in many ways a philosophically bleak movie. But at the same time, the humanism of the direction kind of betrays that philosophy. There are a lot of monsters around the central players here, but the cashiers, receptionists, and other random side characters they meet along the way are given a stark innocence.
That Ending: On The Count of Three
I’m not sure how I feel about any of this. Is it too bleak? Not bleak enough? Or just not made with enough confidence to come out strongly in either direction? Whatever the case, I think this movie hums along perfectly fine. Until the last minute.
For the most part, On the Count of Three is very insular. We’re never not following Val and Kevin, and it takes place over the course of a day that they spend almost completely alone.
The final shot, which I won’t give away, finally pulls us out. We recognize that Val’s story is one of a million stories, all different, all wrestling with life and death, and all ending in the same rotten place. It’s certainly the most striking ending I’ve seen this year, and it made me think twice about the film overall.

Final Thoughts
When I’m reflecting on this year, I don’t think On the Count of Three will end up one of my favorites. Seeing how far Carmichael has come, this film’s steady, dry lob isn’t the catapult that Annapurna hoped it would be. Still, it’s a perfectly solid film. It’s absolutely worth seeing for its final shot alone. B
On the Count of Three is now playing at Landmark’s Ritz Five and available on digital.
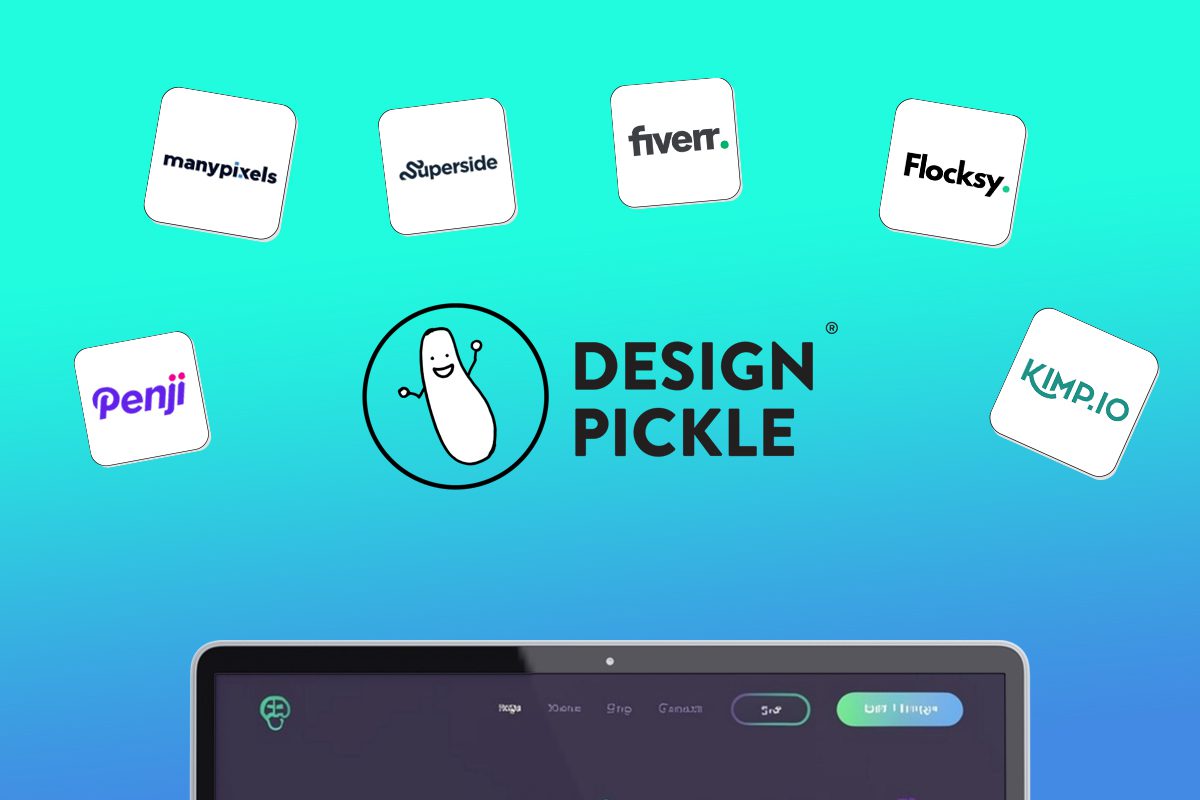
Looking for an alternative to Design Pickle? We have just the list for you.
Design subscriptions are now popular amongst entrepreneurs, small businesses, and even corporate giants. The model is simple: you pay a flat monthly rate and get as much design help as you need – websites, custom illustrations, branding assets, ad design, packaging design, and more.
In a world where traditional agencies charge exorbitant fees and the freelance market is hit or miss, more and more brands are opting for this simple, comprehensive design solution. If you have no time to vet freelancers for every project and no budget for a team of in-house designers, this might be a perfect fit for you.
We went ahead and ranked the top unlimited graphic design companies in the industry that rival Design Pickle.
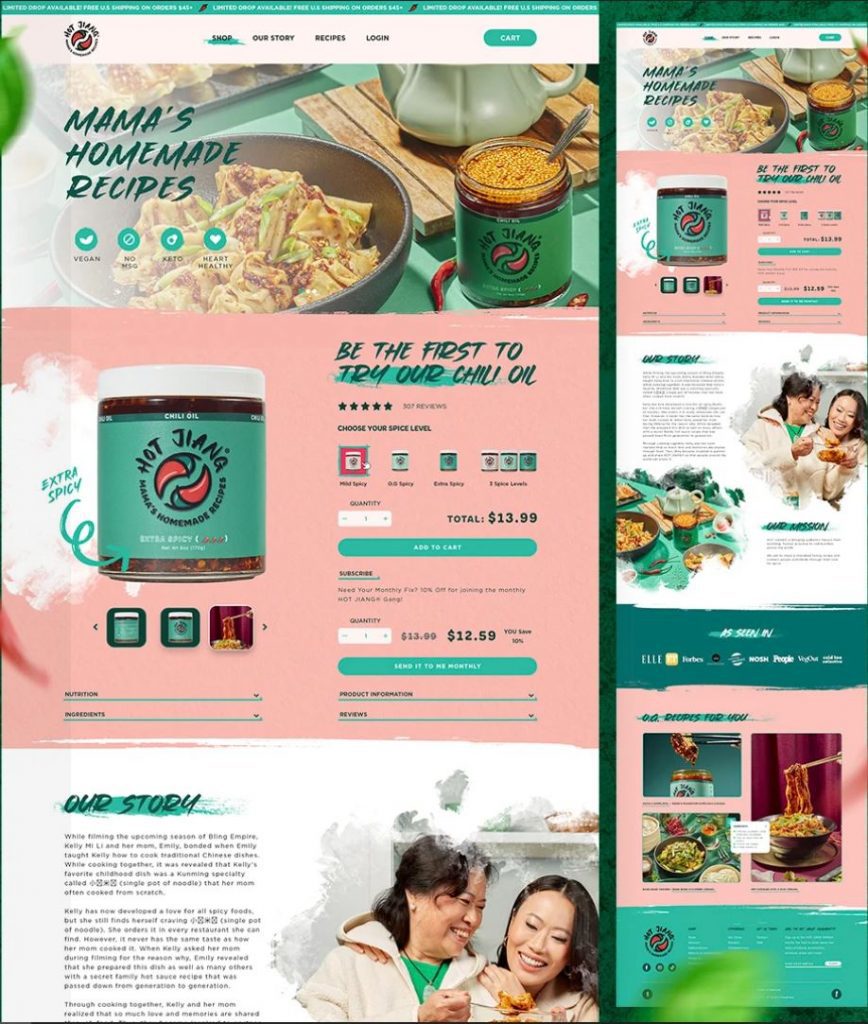
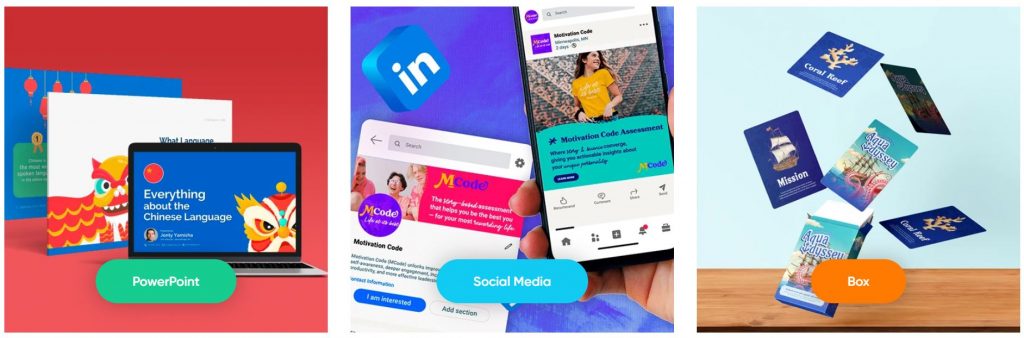
1. Penji
One of the top competitors of Design Pickle is Penji. This is because Penji offers a very comparable gamut of design services at a lower price point. Penji is one of the biggest unlimited graphic design providers in the industry and has consistently received strong reviews (4.8 average) across sites like Trustpilot, Facebook, and Google.
Penji stands out for its responsive customer service and exceptional designers. Their user-friendly platform makes requesting designs simple, allowing users to easily navigate and communicate with their designer. Each tier of Penji’s subscription is tailored to cater to diverse requirements, be it ad creatives, presentation designs, or motion graphics, ensuring various types of clients get the most value for their dollar.
Why we recommend:
– Designers are matched to your project based on their skillset and your specific need
– Penji offers logo designs, illustrations, and UX/UI for apps & websites
– Their customer support is responsive and quick
– There are over 100 design services to choose from
– You get access to a Project Manager or Art Director at higher tiers
Price: $499-$1497
2. Superside
Superside is a well-known company offering scalable design solutions that are suitable for brands of various sizes, from startups to large enterprises. Their services are priced significantly higher than other graphic design services, so they’re best for companies with larger budgets.
Why we recommend:
– You get access to a dedicated design team
– They offer static and motion ad creative for testing ads
– They’ve worked with big brands like Google, Shopify, and Meta
– Superside’s video production quality is top notch
– If you run out of design credits, you can order more at any tier
Price: $5,000-$13,000 (50-150 credits)
3. Fiverr

Fiverr is the only non-subscription service on the list, but many people don’t realize that individual freelancers can now offer subscriptions on Fiverr. The platform is famous for its wide range of freelance services at an incredibly affordable price. Typically, Fiverr matches you with a freelancer for a one-off project like a logo or website design. You might be able to get a logo for just $15, but in-demand designers might charge you $1000-2000 for a website.

Why we recommend:
– Fiverr manages the relationship, making financial transactions safer
– There’s no need to waste time or money hiring a full-time designer if you don’t need one
– You can choose from hundreds of designers to find the exact style you like
Price: varies widely (You might be able to get a logo for just $15, but in-demand designers might charge you $1000-2000 for a website.)
4. Flocksy
Flocksy is another unlimited graphic design service much like Penji and Superside. The company has a decent reputation online and offers comparable services to other design subscriptions. However, there are two major differences: They offer copywriting and video editing. Flocksy gives you access to an easy-to-use platform for submitting requests, tracking progress, and communicating with the creative team.
Why we recommend:
– Flocksy offers video editing and copywriting in their two highest tiers
– You can get Zapier integrations at every tier if desired
– They offer a 14-day money back guarantee if you choose not to continue
Price: $499-$1695
5. ManyPixels
Manypixels is another growing company that offers a similar service to Design Pickle at a comparable price. The company boasts clients like Teachable and Buffer. You can also get free stock assets from Manypixels, which is a nice perk to complement unlimited designs.
Why we recommend:
– Have an intuitive online platform for communication and storing files
– Pay monthly, quarterly, or yearly (save 10% quarterly, 20% yearly)
– Get a designated designer at the highest tier and collaborate in real-time
Price: $549-$1299
6. Kimp
Kimp is similar to other graphic design subscription services but offers unique pricing tiers. Unlike its competitors, Kimp provides both design and video services without requiring separate plans, ensuring a comprehensive creative solution. Clients also benefit from dedicated design and video teams, ensuring consistent quality and brand alignment across all projects.

Why we recommend:
– Choose only what you need: video, graphics, or both
– A speedy 2-4 day turnaround for video projects
– Kimp offers a 2-month discount as you’re getting started
– Get free stock video, audio and images in their top tier
Price: $599-$995
7. DesignJoy

DesignJoy came along just two years after Superside and have similar price range. They’re a big name in the design industry because they’ve worked with brands like Google and Verizon. Their standard tier allows you the manage unlimited brands along with unlimited users and stock photos.
Why we recommend:
– Webflow development available on both tiers
– Unlimited users on their higher tier
– You can refer a friend and get 5% monthly recurring commissions
Price: $4,995-$7,995
8. Delesign

Delesign has existed since 2017 and has leveled up its services each year. For the same price as many others on the list, Delesign also offers 2D animation videos. We’re not sure of the quality, length, or requirements, but this is a great bonus for brands that want to incorporate it.

Why we recommend:
– 2D animation videos are included in the package
– Guarantees quick turnaround times for initial drafts: 24 to 48 hours
– Zapier and Slack integrations on every plan
Price: $599 – $1799
9. No Limit Creatives
Roughly the same age as Delesign, No Limit Creatives is another design services that has grown in notoriety in recent years. They’re unique in that they offer 4 tiers for graphic design while most offer 3. Like Kimp, they have a tier for graphics and video, and each tier allows a different number of requests at a time. Their lowest price tier uses design credits much like Superside’s model.

Why we recommend:
– Get a dedicated design team on 3 out of 4 tiers
– A whopping 3 requests at a time are available at the highest tier
– The highest tier also offers real-time communication through Slack
– NLC provides video editing and video creation
Price: $499-1499
10. Kapa99
Kapa99 is a small company but they compete well with larger competitors like Design Pickle. They’ve been around since 2014 and thus have had plenty of time to perfect their craft. Kapa’s tiers are split into just two: Business and Business Express. Express offers speedier delivery for clients with more pressing deadlines.
Why we recommend:
– They offer a significant discount for the first two months of your subscription
– There’s no limit to how many ‘active tasks’ you can have on your dashboard
– Native Adobe source files
– Canva file delivery
Price: $499-$999

Top 12 Uses for The Metaverse That Will Change Your Life

Top 10 Best Places to Buy a Mid Century Modern Office Chair

The Best Online Payroll Services [Updated for 2025]

Top 10 Small Business Organization Tools for 2025

8 Best Equipment for YouTube Every Content Creator Needs

Merck Seagen Buyout: What to Know About the Deal

The Rise and Fall of Juul: Once a Silicon Valley Darling, Now Banned by FDA

What’s the Deal With Elomir? Is Axis Klarity a Scam?

Why Having an Advisory Board Could Make or Break Your Startup
Top 10 Best Places to Buy a Mid Century Modern Office Chair

Loom Review: Features, Use Cases, and How It Stacks Up Against Zoom
8 Best Equipment for YouTube Every Content Creator Needs
The Rise and Fall of Juul: Once a Silicon Valley Darling, Now Banned by FDA

The Best Ways to Recession Proof Your Business
 Business2 days ago
Top 10 Best Places to Buy a Mid Century Modern Office Chair
- Technology4 days ago
8 Best Equipment for YouTube Every Content Creator Needs
- Technology3 days ago
Top 10 Small Business Organization Tools for 2025
- Technology1 day ago
Top 12 Uses for The Metaverse That Will Change Your Life
- Business2 days ago
The Best Online Payroll Services [Updated for 2025]