
Reviews
iRoad X10 4K UHD Dashcam Review
The iRoad X10 is a high-end Korean-made dash-cam that’s made a name for itself globally. In parts of the world where temperatures are extreme, car owners struggle to find a suitable dash-cam that can withstand the heat and still perform reliably. iRoad’s latest addition, the X10, is the successor of the X9, which preciously garnered much success. Does the X10 deliver on all of its promises and more? And is it worth the $400+ price point given its competition Blackvue and Thinkware have similar offerings?
What’s In The Box?
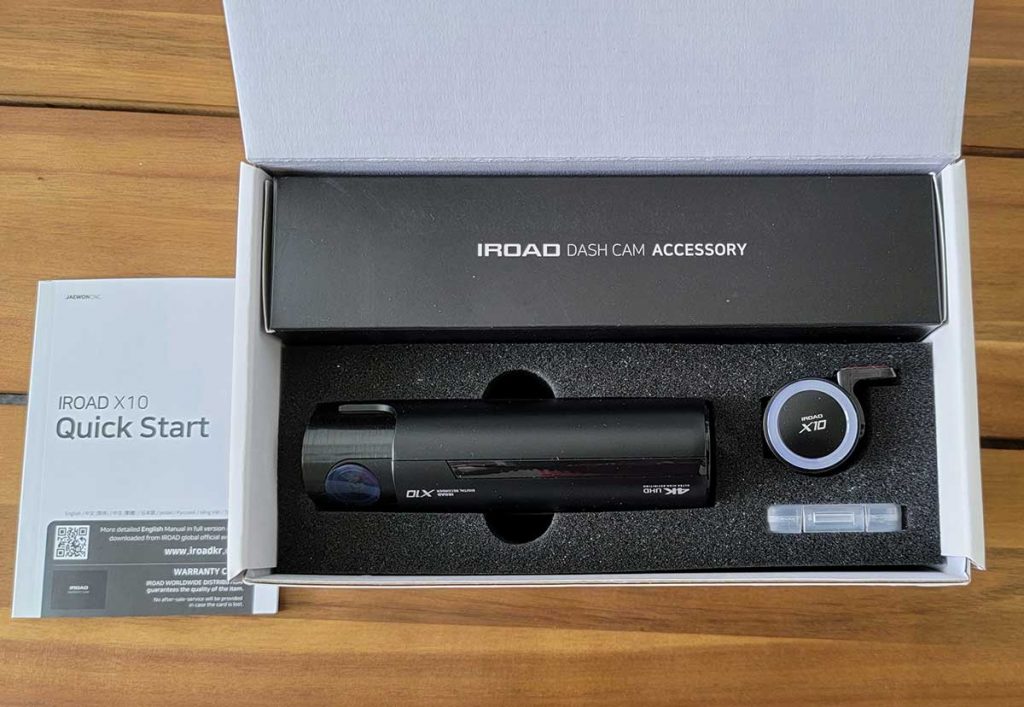

First, let’s take a look at what’s inside the box. iRoad packaged the X10 in eco-friendly and consciously compact packaging, which is greatly appreciated. Inside the box, there’s the front camera, rear camera, various cables, instruction manual, and a 32GB MicroSD card. The OBD sensor is an accessory that can be purchased separately and does not come with the iRoad X10 by default. However, it’s well worth the investment, given the onboard telemetry data it provides.
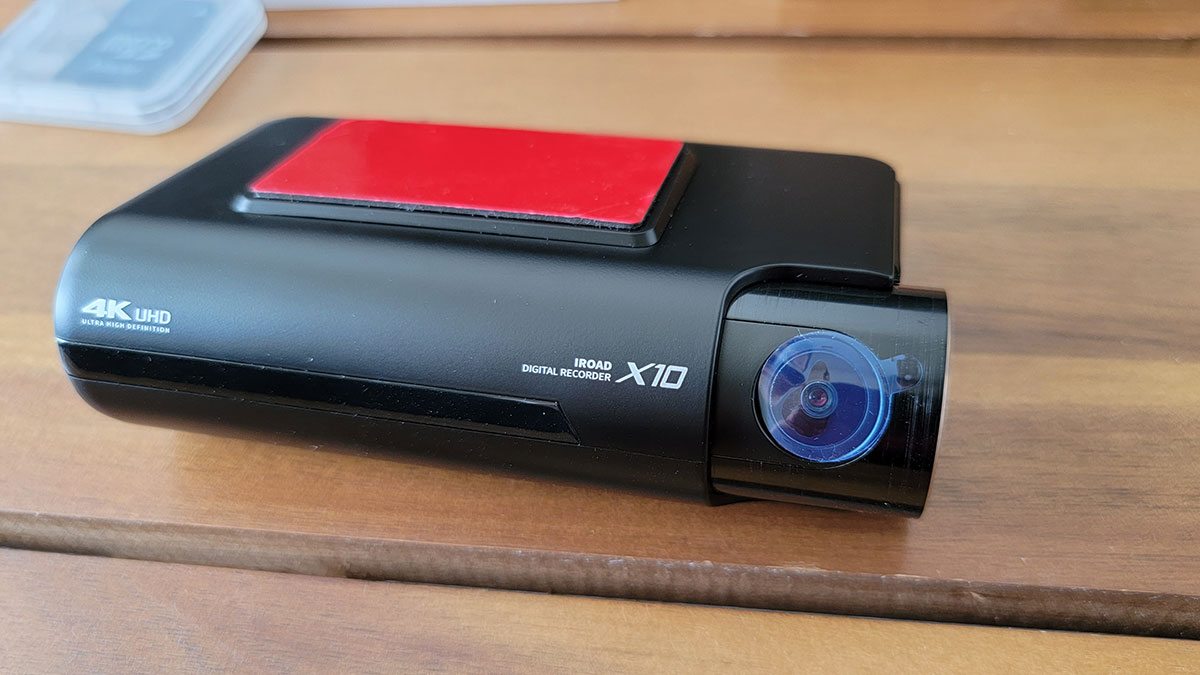
The Design

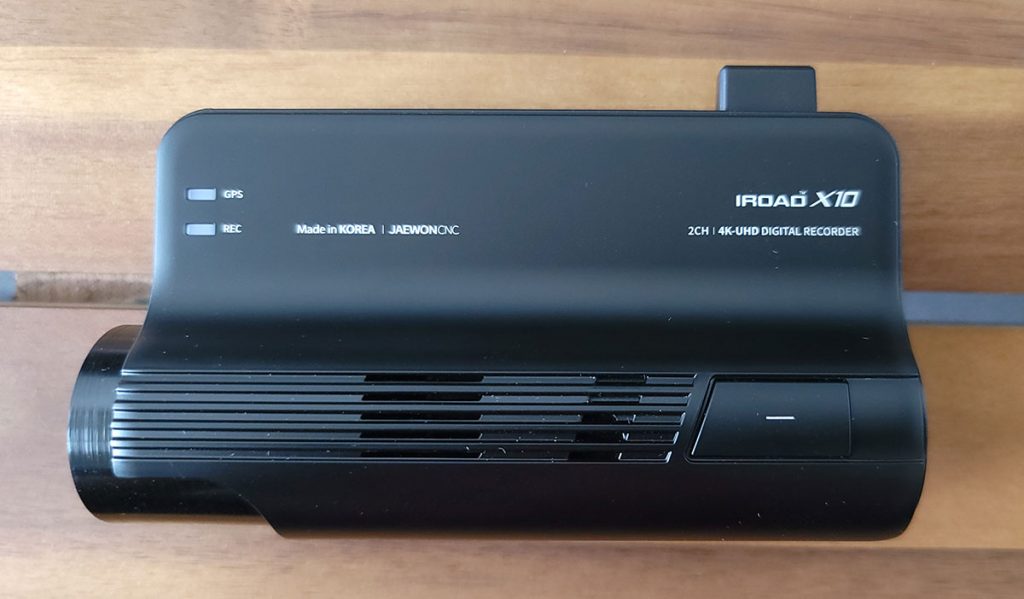
The X10 has a simple tried and true design that’s been tested and proven on the road. There’s no onboard LCD screen. Almost everything can be accessed via the iOS and Android app to download and connect with the unit. Side buttons and ports are easily accessible. The 3M sticker pad is generously large, making installation simple.
Build quality
When picking up the X10 for the first time, you’ll notice that it’s ridiculously light, as if it’s hollow inside. It’s much lighter than its Blackvue counterpart, which also sports a similar design. Being lighter doesn’t mean it lacks in any department.
Build quality feels solid. It’s made from somewhat sturdy ABS plastic and doesn’t look or feel cheap. I’m a fan of the dual-tone piano black and matte finish.
Ports & Cables
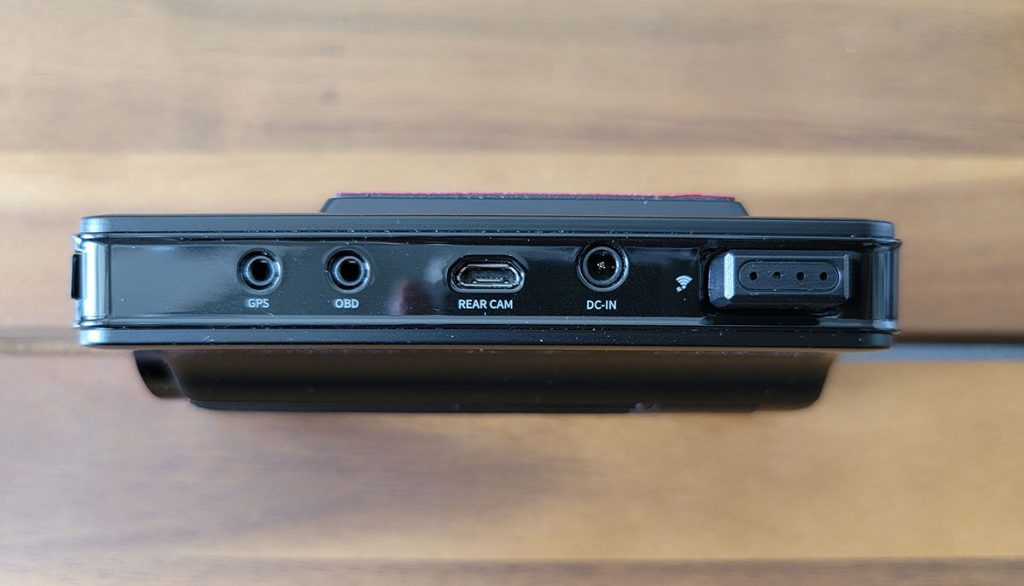
On the rear (facing you) side of the unit, you have a micro USB port, DC in, OBD, and GPS port. You can find the MicroSD card slot underneath the protective cover on the other side.
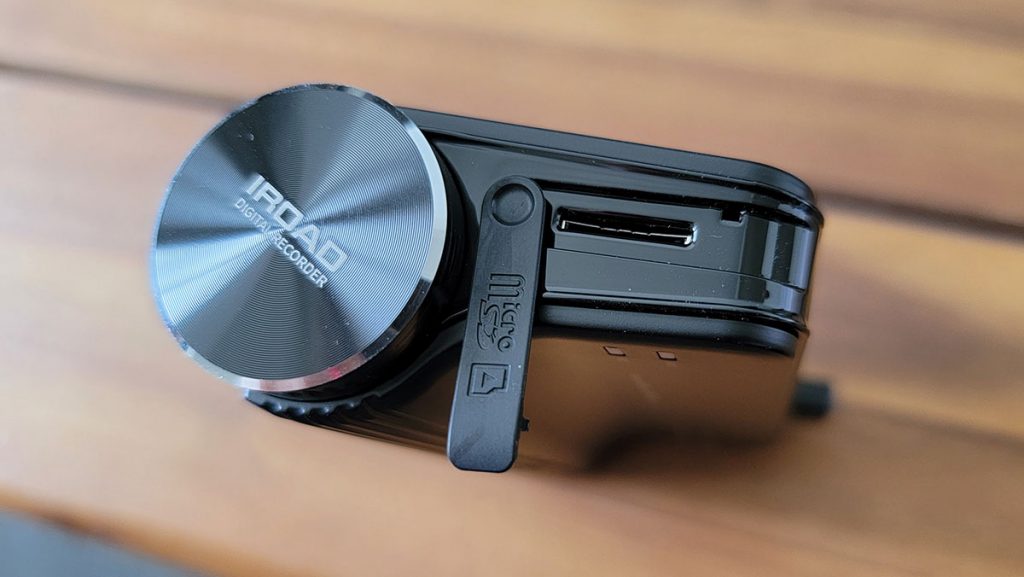
All of the cables you’ll need are provided in the box and are plenty long. You shouldn’t have any issues with cable length when installing.
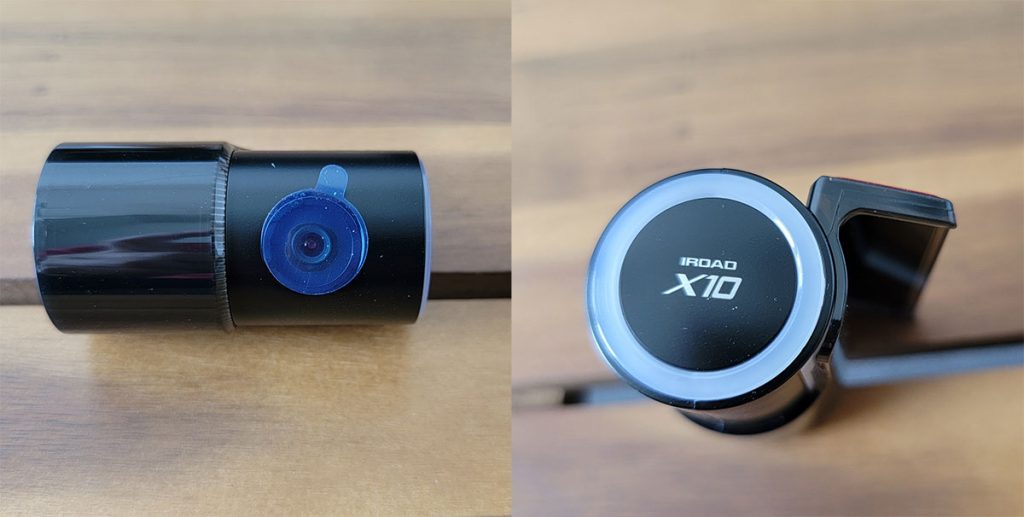
Front Camera
The X10 has one of the widest viewing angles out of any dash-cam on the market today. All your bases will be covered with the 165 degrees viewing angle. Onboard the front-facing camera unit is an 8 megapixel 4K UHD (ultra high definition) camera.
The camera is also equipped with iRoad’s proprietary X-vision technology that automatically adjusts the camera depending on the brightness outside. This helps avoid useless washed-out recordings. Other manufactures also have a similar tech to enhance video quality; however, in my opinion, iRoad’s X-vision adaptation offers the highest resolution, especially on glaringly bright days.
The front camera module also features a nice security feature. There’s an LED strip that flashes back and forth when your car is parked. The flashing lights can help thwart away potential theft since they’ll likely notice the vehicle has some onboard security device.
Rear Camera
The rear camera uses Sony Exmor IMX323 Sensor. It’s a good lens for a rear camera. Although the resolution isn’t nearly as clear as the front camera, you’d only need the rear camera if someone rear-ends you. In that situation, you won’t have any issues identifying the plate’s number.
Camera Performance
[Dashcam footage coming soon]
We’ll mostly be discussing the front camera. The ultrawide 165-degree camera angle gives plenty of visibility on the road. Additionally, the 8-megapixel camera gives high resolution and clear picture quality during the daytime. This isn’t a surprise given the price of this dashcam. However, when compared to Blackvue and other competing dashcams, the X10’s resolution under-performs noticeably.
Another issue is the locked fps. The unit is locked at 30fps for both the front and rear cameras. This may or may not matter to you, but most other dashcams on the market in this premium price range offers 60fps recording. So it was disappointing to see this feature missing.
The good news is that you’ll hardly notice these issues during everyday use. We recognized it because we review products and make side-by-side comparisons. For most situations, the footage quality is adequate, and you can make out license plates and street names up to 20 – 25 feet.
Both the front and back cameras are also durable and resistant to temperature extremes. This is one of the features that iRoad is known for. Both cameras can withstand a range from -20 Celsius to 70 Celsius.
Night Time Performance
[Dashcam footage coming soon]
Other dashcam models seem to suffer when I’m on a dark highway, and then I hit a sudden area with light. The lens often has a difficult time adjusting to the light and dark areas quickly, and as a result, there’s a loss in picture quality.
The iRoad X10 doesn’t seem to have this problem. The front camera seems to adjust the brightness and contrast on the fly as soon as I exit a dark tunnel, enter a well-lit area at night, or go in and out of shades. Although I haven’t confirmed this with iRoad’s engineers, night-time visibility seems to be influenced by X-vision. Overall, night-time performance is exceptional.
OBD X Scanner
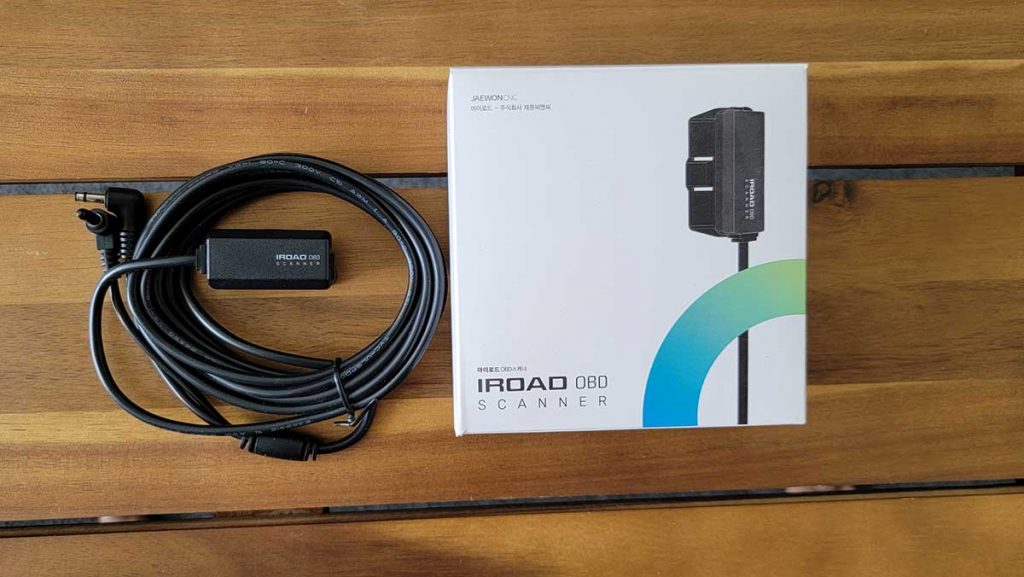
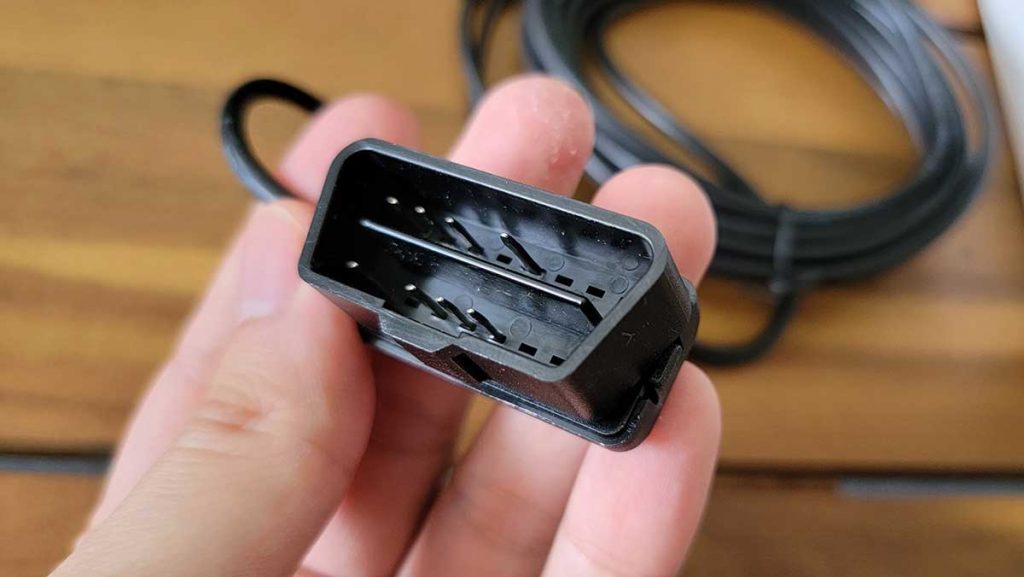
No hard wiring: This is a highly recommended optional purchase. It’ll save you the hassle of figuring out how to wire the iRoad x10 to your console correctly. With the OBD scanner, you need to connect it to the OBD port directly under the driver’s side console, and you’re good to go.
Real-time car data: However, convenience is just one of the benefits of the OBD X Scanner. With this scanner, the Dashcam can display your car’s telemetry in real-time when you export the videos onto your computer. It’ll show you information about your vehicle, the speed that you’re driving, whether or not you had turn signals on, and much other useful information that could prove valuable in the event of an accident. Here are some of the data the scanner can display:
- Speed
- Turn signals
- Park/Drive/Reverse gears selected
- Fuel consumption
- Fuel efficiency
- Coolant temperature
- Transmission oil temperature
- Battery information
- DPF info
Detecting car issues: The OBD scanner also acts like a regular OBD scanner auto shops use to figure out what’s wrong with your car. If your car has any issues, it’ll display the issue code on your phone.
If you’re planning to buy this dashcam, you need to buy the OBD X scanner. It’s an incredible value for just an extra $49.
Viewing Videos
You can view all your videos on your iOS/Android app or on a PC/Mac. If you want to view from a computer, you’ll need to download iRoad Viewer to export and view all the saved clips since the files are recorded in JDR format. For those who are not tech-savvy, this can be a bit confusing. However, follow the instructions on downloading and using the iRoad Viewer on iRoad’s website, and you’ll be fine.
They also recently came out with a Mac version of the viewer, so you’ll be able to see your videos on Windows or Mac.
Compared to other dashcams, I like that there is dedicated software to watch all of the clips. The initial setup was intimidating, but once you start using it, you’ll never want to go back. There’s a level of convenience and polishness to having all of the clips in one place and quickly viewing each one without having to open/close video files.
If you have the OBD X scanner installed, the added telemetry is the real kicker. Seeing every mechanical action, you took while driving adds a layer of security and peace of mind that no other cam gave me. In the event of an accident, I would feel 100% safer and protected because I have the video footage AND the onboard data that I was driving the speed limit, signaling, and taking precautions.
Parking Mode
You’ll either need the OBD scanner or hardwire the device to your car to use this feature. This is a helpful feature if you’re leaving your vehicle in a garage or a sketchy part of down and you want to keep an eye on it. You can activate it on your phone. Once activated, it’ll record a timelapse video at one frame per second. With the included 32GB micro SD card, you can expect up to 16 hours of recording. Not bad.
Motion & Impact Detection
Another neat security feature is motion & impact detection. Once activated, the camera will start recording if anyone gets within 3 meters of it. It’ll record at 10fps, and you’ll get an alert on your phone.
Storage capacity
The dashcam comes with 32GB microSD to get you started. Luckily, it can support up to 1TB microSD. That’s probably far more storage than you’ll need. However, it’s greatly appreciated since comparable models often limit SD card storage capacity to 128GB or 256GB.
iOS/Android App
This is an often-overlooked feature when deciding which dashcam is right for you. All of the features and functionalities are useless if the user interface to access them is clunky. The engineers didn’t overlook the app development, and it shows. It’s a robust, responsive, and intuitive app. There’s no learning curve. Downloading, connecting, and figuring out all your settings takes less than 5 minutes. It’s not the prettiest-looking app, but it’s clean, minimalist, and highly responsive.
When I click on the “Live view” to see the live feed from my car that’s parked 100 meters away from my apartment, I expected it to take a while. But it booted up in less than 5 seconds, which is impressive given connectivity from inside my car isn’t great.
Other useful features
Here is a list of other useful features that come with the iRoad X10 dashcam.
Lane Departure Warning: Alerts you when you’re veering out of the lane at a certain speed. You can adjust the speed and how sensitive you want the sensors to be.
FVDW: Stands for Front Vehicle Departure Warning System. A fancy way of saying it’ll alert you when the car in front of you starts to move in traffic.
FCWS: Forward Collision Warning System. The dashcam will alert you when you’re going too fast and could be on course for collision.
Parking mode: Enabled recording at 1fps while parked. You can also adjust the sensitivity.
Motion detection: Will record when it detects motion.
Security LED: Turn on/off the light security strip on the dashcam’s front while the car is parked.
High temperature shutdown: Automatically shuts the unit down when it exceeds 75 degrees Celsius while parked.
Final Verdict
The X10 does have some issues. The front camera resolution could improve and enable 60fps recording, and the Android app could use a major update.
Although there are problems, the X10 excelled in an area that mattered most – reliability. I’ve not had one feature crash throughout the last three months of use or failed to work on me. All sensors, parking/security modes, and safety functions work 100% of the time. This gives me peace of mind knowing that mechanically this dashcam will never let me down.
The X10 is the most complete dashcam you can buy right now. If you’re looking for an easy-to-use dashcam with all the safety and security features that’s also easy to set up, look no further. If you’re not afraid of wires and want the latest tech and connectivity, the X10 will deliver. At $419 USD, it’s an expensive investment. If reliability and peace of mind is your top priority, then the IRoad X10 is well worth it.


Interested in signing up for Demio? You can support us by getting started with this link.
I kind of hate the word “webinar.”
I’m not alone, either. You can find it in several lists of the English language’s biggest travesties. It’s a holdover from the heyday of lame Web 2.0 portmanteaus, alongside “webisode,” “netizen,” and “listicle.”
However you feel about the word, the webinar itself is anything but dated. The more work moves online, the more vital webinars become for drawing new clients (and keeping the old ones).
Yet, despite their importance, many platforms still haven’t nailed the experience. Some are clunky, others unreliable.
In this updated Demio SaaS review, we take another look at the browser-based webinar tool by Banzai to see if it still strikes the right balance between simplicity and functionality in 2025. Can Demio stay ahead of the curve—or is it time to move on?
Let’s find out.
What is Demio?

Demio is a browser-based webinar platform designed to make hosting and attending online events as frictionless as possible. Founded in 2014 and now part of the Banzai ecosystem, it was built in response to the clunky, download-heavy webinar tools that dominated the early 2010s.
As this Demio SaaS review shows, that original mission still holds up in 2025. While the pandemic era pushed dozens of companies to improve their virtual tools, many platforms still require attendees to install software or jump through technical hoops just to join a session.
Demio’s solution? Keep it in the browser. No downloads. No plugins. Just clean, streamlined webinar tech that anyone can use right away.
It’s positioned squarely in the SaaS space, with subscription plans that scale from solo creators to enterprise teams. And while it’s optimized for marketing and lead generation, the platform’s ease of use makes it appealing across industries.
Looking for other video communication tools? Check out our Loom review.
Getting started with Demio: Free Trial and Pricing
No Demio SaaS review will be complete without the pricing tier. To sign up for a 14-day free trial, just create an account, and you’re ready to explore the platform.
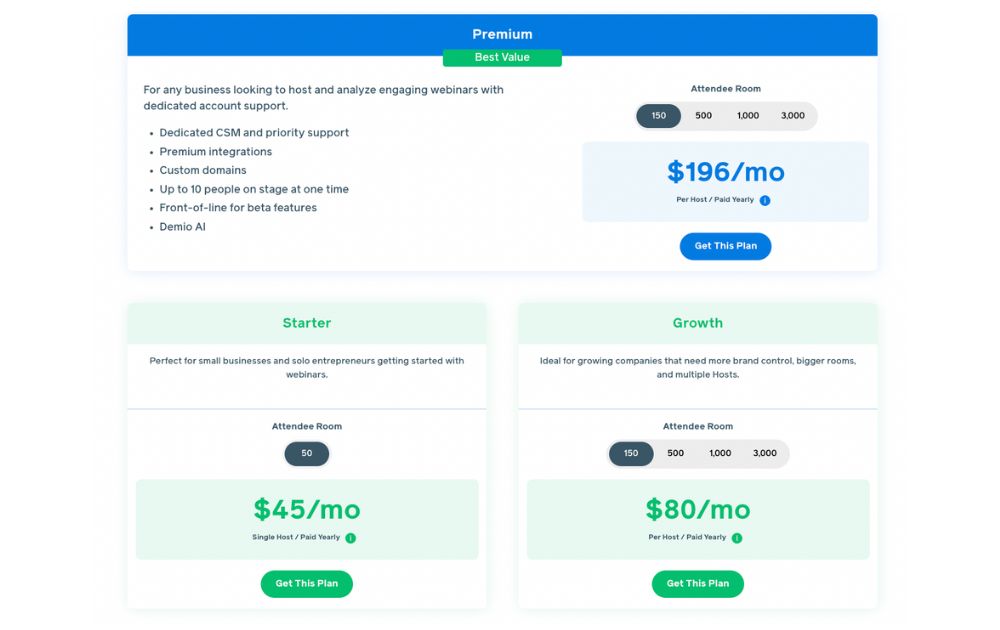
When you’re ready to upgrade, Demio offers three main plans tailored to different business needs:
- Starter – $45/month per host (paid yearly). Perfect for small businesses and solo entrepreneurs getting started with webinars. This tier is for one host for up to 50 attendees. It also comes with core features to launch live webinars easily.
- Growth – $80/month per host (paid yearly). Ideal for growing companies that need more flexibility and brand control. This tier accommodates multiple hosts, with attendee rooms from 150 up to 3,000. This plan also comes with custom branding and enhanced integrations, and reporting.
- Premium – $196/month per host (paid yearly). Designed for larger teams and enterprise use. This tier comes with dedicated CSM and priority support, premium integrations and custom domains, Demio AI, and access to beta features. With this plan, you can have up to 10 people on stage, with attendee rooms of 150, 500, 1,000, or 3,000.
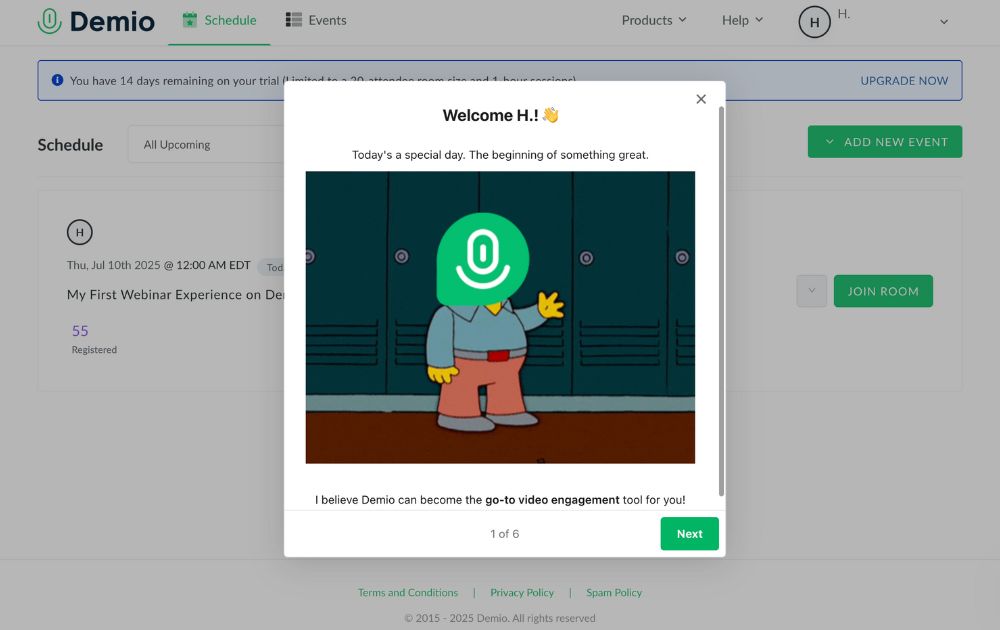
Demio’s free trial requires no commitment or credit card details. Just sign up, fill out a brief survey on how you plan to use the app, and you’re golden.
Demio Features
Demio keeps things simple without skimping on functionality. Once you’re signed in, you’re welcomed by a clean, intuitive dashboard that puts your upcoming events front and center.
Here’s a breakdown of the core features that make Demio a standout in the crowded webinar space:
Dashboard
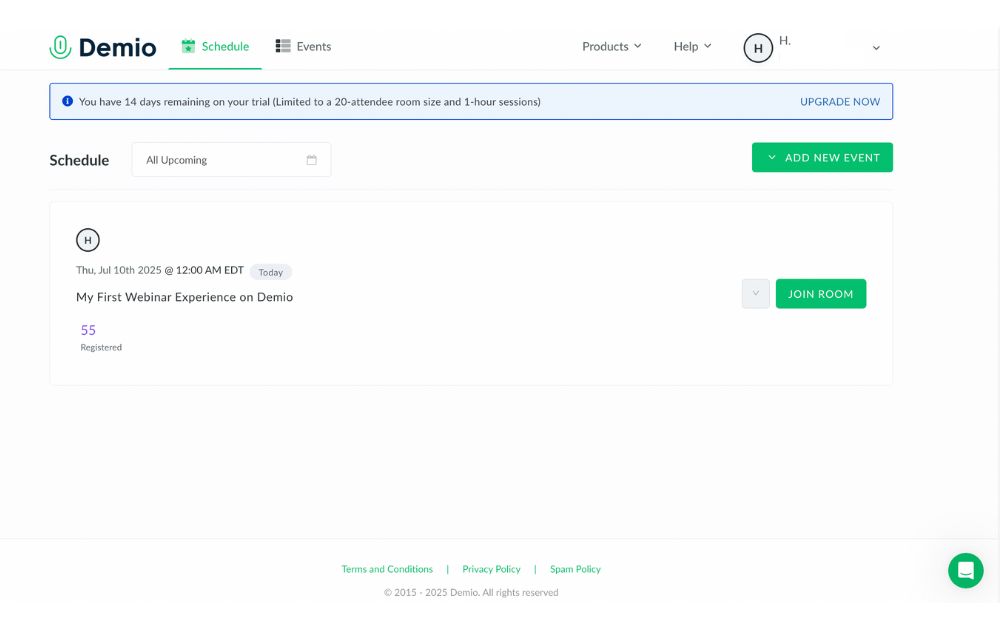
Demio’s dashboard is built for clarity. You can quickly scroll through upcoming sessions, monitor your events, and navigate between tabs like Schedule and Events. It’s functional, but still has room to improve,especially when switching between creating and managing events. A unified view would make it even smoother.
Events
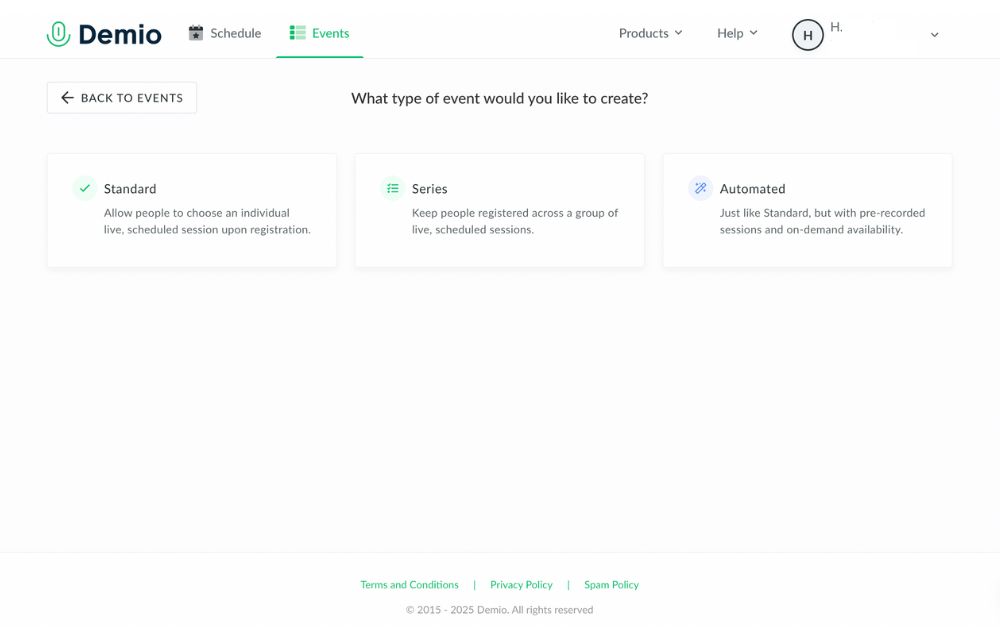
Demio lets you create three types of events, each tailored to different use cases:
- Standard Events – Traditional live webinars where attendees register for a single session at a specific time.
- Series Events – Great for multi-part webinars or training sessions. When users register for one, they’re automatically signed up for the entire series.
- Automated Events – Pre-recorded sessions that run on autopilot. Perfect for lead nurturing or delivering evergreen content without going live.
Automated events continue to be one of Demio’s strongest features, letting you scale your content while staying hands-off.
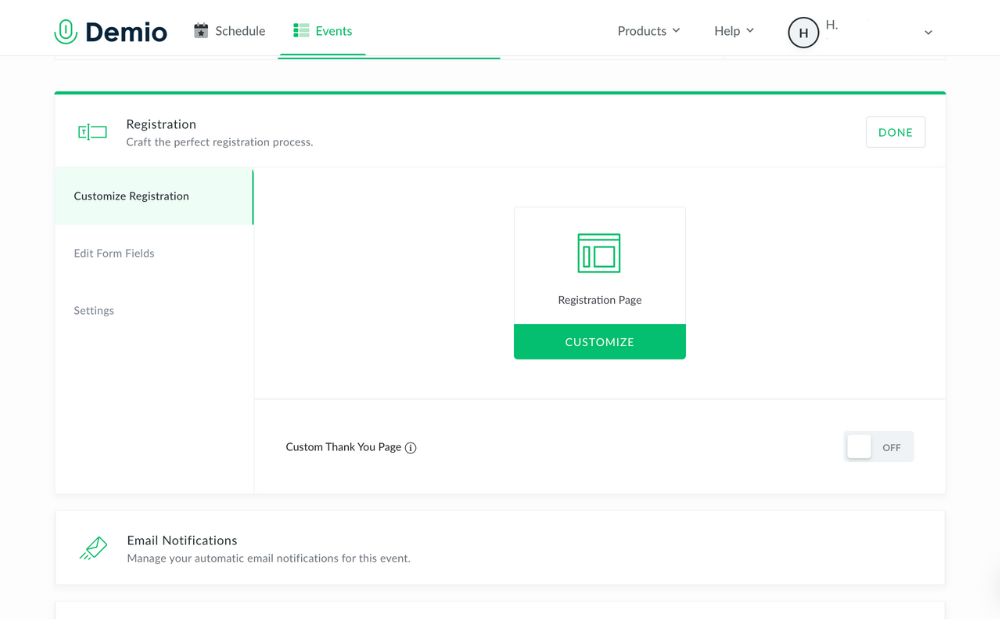
Customization
Before your webinar goes live, the Customize tab lets you tweak everything from registration forms to event visuals. You can upload slide decks, create interactive polls, set up handouts, and even brand your webinar pages to match your company’s look.

For Growth and Premium users, custom domains and branding take things even further—ideal for marketing teams or agencies.
Once you’re ready to get started, you can join your session in the Schedule tab. The layout is familiar, with speakers’ video taking up the left and center while the chat tab takes up the right side.
Only one person can be “on stage” at a time, but you can also add and access materials like slides and videos with the middle button on the bottom toolbar. Meanwhile, the + icon next to the chat box lets users access polls, links, and handouts.
Reports
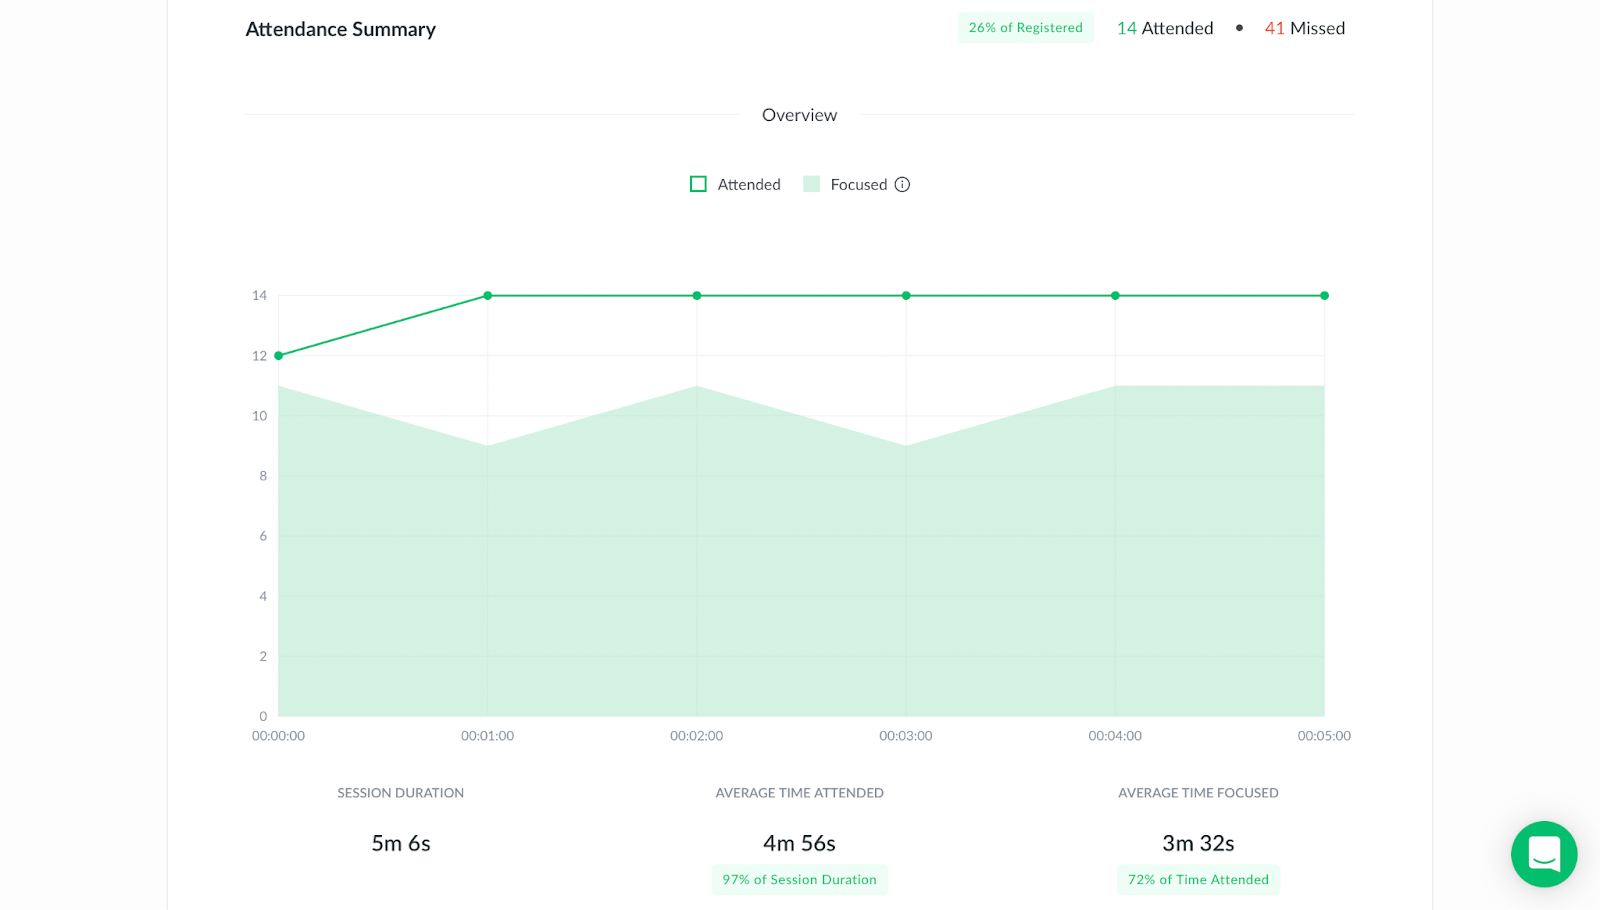
After your session ends, head to the Activity tab to access attendance reports. You’ll see who registered, who actually attended, how long they stayed, and what they engaged with during the session.
Downloadable CSV files make it easy to follow up with participants or segment your leads—an especially useful feature for marketers.
While the data is useful, the reporting could be more advanced (think engagement heatmaps or behavioral trends). Hopefully, that’s in Demio’s roadmap for the near future.
Integrations
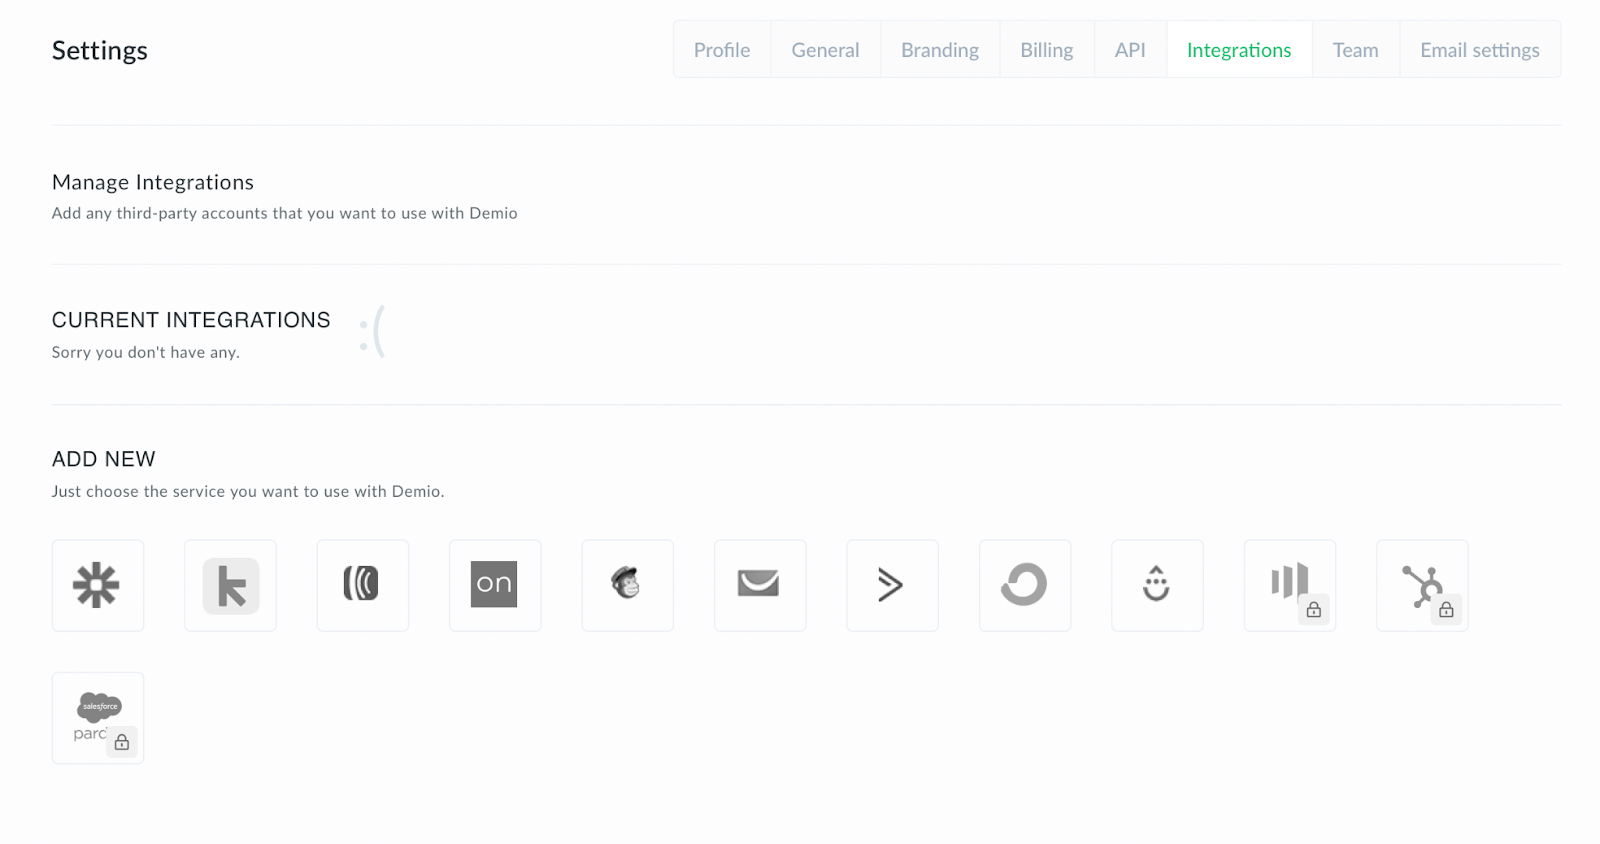
I’d honestly like to see a little more variety from Demio’s integrations. On the one hand, their tilt towards martech integrations makes sense. Webinars are generally used for marketing, and being able to connect with Keap, Mailchimp, or your CRM of choice has obvious benefits.
Still, I think there’s a lot more potential to be had with connecting different software to a video conferencing tool. Translators, editing tools, OBS… the sky’s the limit.
Perhaps the most useful integration is with Zapier. Their micro-integrations let you connect to PayPal, Gmail, Slack, and more.
Conclusion: Is Demio worth it?
If you’re seeking a platform to create engaging webinars, Demio is a great place to look. It’s as intuitive as they come, with a number of unique features that set it apart from the competition. Even among browser-based video tools, the fact that it works on any browser puts it ahead.
As of now, Demio is completely focused on webinars. It’s a leader in that market, so they’re clearly doing something right. Where it disappoints, however, is where it feels too laser-guided towards marketing. By just slightly expanding a few features (integrations, reports, in-call elements), I think Demio’s potential could be that much greater.
PROS
- No-download, browser-based platform
- Quick, user-friendly setup
- Supports live, automated, and series events
- Clean, customizable interface
- Great for marketing and lead generation
- Solid integrations with CRMs and email platforms
- Zapier access unlocks thousands of app connections
- Custom branding and domains (Growth & Premium plans)
- Strong customer support and onboarding
- Scalable plans for teams of any size
CONS
- Limited native integrations outside of marketing tools
- Reporting could be more robust (e.g., engagement insights, AI summaries)
- Dashboard navigation could be more streamlined
- Higher-tier pricing may be steep for very small teams
Overall rating: 8.9/10
Ready to give Demio a try? Sign up here.
Frequently Asked Questions
Is demio.com safe?
Yes, demio.com is a secure and reputable site owned by Banzai, using encryption and standard security protocols to protect user data and webinar content.
Is Demio like Zoom?
Demio and Zoom both support video communication, but Demio is specifically built for webinars and marketing events, while Zoom is designed primarily for meetings and general video conferencing.
Is Demio easy to use?
Yes, Demio is known for its clean interface and intuitive setup, making it easy for both hosts and attendees to run or join webinars directly from a browser.
Are you tired of keeping up with long email chains or trying to sync everyone in the team for a live call? If you answered yes, then Loom could be an efficient tool for you. In this Loom review, we’ll unpack how you can use Loom to explain complex ideas, give feedback, or walk someone through a task without going on a live call.
We’ll also explore its standout features, use cases, pricing plans, and how it compares to Zoom so you can decide if it fits your team’s workflow.
What is Loom?

Loom is a video messaging app that lets users record and share video messages with teammates and clients. Using Loom, you can record your camera, microphone, and desktop screen at the same time.
According to online Loom review, this is especially useful for individuals to create tutorials, demonstrations, and presentations, as well as to share feedback.
Loom users can choose to record with the Loom Chrome extension, the desktop app, as well as the iOS and Android apps.
Some of Loom’s clients include Brex, Intercom, Postclick, and more.
Loom Features

Loom has various features that allow it to seamlessly integrate into a company’s existing workflows.
Users can play Loom download videos within platforms like:
- Slack
- Jira
- Confluence
- Github
Why does this matter? Users will no longer be led to an external link, increasing their productivity by playing feedback videos within the platform.
Next, Loom video has an AI suite that can help teams work more efficiently. Using AI, the tool can:
- Automatically generate meeting notes and recaps, among other things
- Instantly create chapters in your videos, as well as CTAs and tasks
- Create text transcription and generate closed captions

To refine your videos further, Loom has features that can remove filler words and silence in a video.
Besides this, Loom also has a video-to-text feature. This is especially useful for asynchronous teams that need help with logging a bug issue, documenting a process, or performing a code review.
Loom Pricing
Loom pricing is generally straightforward. If you want to know if Loom is free, yes, it does have a free tier.

It has a free Starter plan for users who want to try out the app’s key features. It can accommodate up to 50 Workspace users, who are each entitled to up to 25 videos with a five-minute length cap.
Next, the Business plan is for teams that want unlimited videos and basic editing. It costs $15 per user per month if billed annually. Here, you can have unlimited members get basic waveform editing, remove the Loom Branding, and more.
According to Loom review, their most popular plan is the Business + AI plan, where teams can get advanced editing and access their AI suite. This plan costs $20 per user per month if billed annually.
Their premium plan is the Enterprise plan, which is best for companies that want to control and securely manage video content for the organization. If you’re wondering, “Is Loom safe to use?” This plan has advanced security and content privacy features as well as admin insights. Teams need to contact Loom’s sales team first to get a price quote.
Finally, Loom has a discount plan for educators as part of the Atlassian Education Program.
Use Case Breakdown
Here are a few Loom use cases:
- Loom review can be especially helpful for tech teams, as it can be used to narrate a bug issue. When an issue occurs, developers or testers can simply record the issue with Loom and report the issue to the concerned developers. It saves time and increases the turnaround time for bug fixes.
- Hiring teams and internal teams can also use Loom to document an internal process for onboarding purposes. Apart from this, it can also be used by customer-facing teams to create user guides on a platform or a new product feature.
- Sales teams can also use Loom to reach out to prospective clients. When cold emails are not friendly enough, sales teams can create personalized video content through Loom and stand out.
- Taking too long to get feedback from all stakeholders? Loom is great for product design teams to get asynchronous feedback from a global executive team. It’s great for instances where it’s difficult to get stakeholders in one meeting.
- Finally, Loom is great for educators and academics who want to create videos for remote classes.
Loom vs. Zoom
While their names sound the same, Loom and Zoom have different fundamental use cases. In terms of Loom review, Loom is best used to record and send videos, which can be used for demos, tutorials, and feedback. In terms of use cases, Loom is more catered to asynchronous communication and screen recordings.

Meanwhile, Zoom is best used for hosting live meetings and large conferences. It has features like breakout rooms and virtual backgrounds. While you can use Zoom to record videos yourself, Loom is more optimized to share video links with teammates and clients.
Final Thoughts: Who Will Get the Most Out of Loom?
Loom is best for companies that need videos for their day-to-day work communication. Whether for external or internal communication, it is great for clients who work asynchronously. In fact, most of their clients include those in the tech and product space.
Their product is useful for tech, sales, and product design teams that need to align with cross-functional teams. Loom is also best for companies that want to tighten their internal feedback loop, demonstrate processes, and get quick updates.

Educators, coaches, and course creators can also benefit from Loom’s features. The platform makes it easy to create clear, engaging instructional videos that students or clients can watch at their own pace. With features like closed captioning, video chapters, and transcription, Loom helps streamline learning and knowledge sharing.
Finally, to sum up this Loom review, freelancers and consultants who want to build stronger relationships with clients may also find Loom useful. Just like gadgets that boost team connectivity, like the Deeper Connect Pico, the global workforce can benefit a lot from Loom. Personalized video updates, walkthroughs, or proposals can set them apart, adding a human touch to digital communication that static emails or text-based reports often lack.
Entertainment
On The Count Of Three Review
A past-due calling card for actor-director Jerrod Carmichael

WARNING: This review, and this film, contain discussions of suicide.
A Dark Premise, A Wobbly Execution
“On the Count of Three” opens with a bold premise: two childhood friends make a suicide pact and spend their last day on Earth tying up loose ends. It’s certainly fresh, but what makes “On the Count of Three” feel oddly stale despite its originality?
It’s not that we’ve seen too many comedies about suicide before. It does, I suppose, bear some resemblance to other race-against-the-clock (Good Time) or apocalyptic (Seeking a Friend for the End of the World) comedies. Maybe it doesn’t commit to darkness as much as these comedies; there’s certainly a humanist core deep down here.
But I think we all sort of know why this movie can’t fully work in 2022: it’s a movie Jerrod Carmichael made in 2020. The director and star has seen a long-overdue rise to stardom in these past months after a series of false starts. He’d already had a breakout role in a hit comedy, a sitcom starring vehicle, a special directed by Spike Lee, and a recurring feature on 2019’s biggest album.
Last month, the stars finally aligned. He came out as gay, dropped a smash-hit comedy special, and hosted SNL all in the span of a week. It’s no surprise that Annapurna Pictures quickly moved to release On the Count of Three, which they picked up at Sundance in January 2021.

Here’s the rub: On the Count of Three lacks the self-assuredness of Carmichael’s recent rise. It doesn’t feel like the film, or the version of this film, that he would’ve made today. His performance as both actor and director is good, but held to a certain restriction.
Two Leads, One Day, A Lot of Pain
Carmichael plays Val, a down-on-his-luck laborer who ventures to commit suicide with the help of his recently-hospitalized friend Kevin (Christopher Abbott).
While there’s a certain comical bleakness to Val’s life—he essentially shovels dirt for a living—there’s an interesting idea of suicidal ideation here. Val’s thoughts of killing himself don’t come from stagnation or trauma, but from dissatisfaction with achievement. He makes his first attempt right after getting a promotion, and we later learn that he had planned to propose to his now-pregnant partner, Natasha (Tiffany Haddish).
As director, Carmichael wisely avoids eating up the film and splits lead duties with Abbott. If anything, Abbott gets the real star showcase here, again proving his dynamic magnetism after a series of weirdo indie turns like Vox Lux, Possessor, and Black Bear.
The Black Comedy Balancing Act
Still, there’s a classic comedic duo chemistry here. Carmichael is the rock around which Abbott orbits. The setup also gives them plenty of opportunities to subvert that dynamic. When Val’s confrontation with his father (J.B. Smoove) gets heated, Kevin has to be the one to pull him back. But, when they come to blows, Kevin’s the one with the tire iron.

Black comedy is always a tricky balancing act. Penn and Teller Get Killed is notorious for going all-in on nihilism and failing to connect. I think this film mostly succeeds, but its uncertainty with its own dark philosophy is, again, reflective of a more self-conscious point in Carmichael’s career.
Bleak, But Also Soft Around the Edges
In Kevin’s first scene, he delivers a monologue about how doctors have been trying to fix him since he was eight years old, and if his life was worth saving, they’d have done it by now. Much of the film follows Kevin’s quest to kill a childhood doctor who molested him (played by Henry Winkler). Ultimately, it’s Val who pulls the trigger, but only after he decides to choose life. His decision to choose life only comes after a guilt trip from Natasha, who lays out how he’ll still be guilty in death if he abdicates his responsibility as a father.
All of which is to say, this is in many ways a philosophically bleak movie. But at the same time, the humanism of the direction kind of betrays that philosophy. There are a lot of monsters around the central players here, but the cashiers, receptionists, and other random side characters they meet along the way are given a stark innocence.
That Ending: On The Count of Three
I’m not sure how I feel about any of this. Is it too bleak? Not bleak enough? Or just not made with enough confidence to come out strongly in either direction? Whatever the case, I think this movie hums along perfectly fine. Until the last minute.
For the most part, On the Count of Three is very insular. We’re never not following Val and Kevin, and it takes place over the course of a day that they spend almost completely alone.
The final shot, which I won’t give away, finally pulls us out. We recognize that Val’s story is one of a million stories, all different, all wrestling with life and death, and all ending in the same rotten place. It’s certainly the most striking ending I’ve seen this year, and it made me think twice about the film overall.

Final Thoughts
When I’m reflecting on this year, I don’t think On the Count of Three will end up one of my favorites. Seeing how far Carmichael has come, this film’s steady, dry lob isn’t the catapult that Annapurna hoped it would be. Still, it’s a perfectly solid film. It’s absolutely worth seeing for its final shot alone. B
On the Count of Three is now playing at Landmark’s Ritz Five and available on digital.

Should I Buy an Electric Scooter? What You Can Learn

Best Workflow Mapping Tools for Smarter Business Processes

Top White Label Marketing Tools for Agencies: Our 10 Best Picks

Virtual Reality Exhibit Carne Y Arena: The Refugees’ Plight

Top 10 Podcast Editing Software Applications for Beginners

What Is Tiktok Pink Sauce? The Viral Condiment, Explained

Did You Drop Your Smartphone in The Ocean? Here’s How to Retrieve It
Top White Label Marketing Tools for Agencies: Our 10 Best Picks
History of the NBA: The Success Behind the Big League

Demio SaaS 2025 Review: Features, Pricing, Pros & Cons
Did You Drop Your Smartphone in The Ocean? Here’s How to Retrieve It
Virtual Reality Exhibit Carne Y Arena: The Refugees’ Plight
Best Workflow Mapping Tools for Smarter Business Processes

Gift Guide: 25 Best Gifts for Women for All Occasions
 Technology17 hours ago
Top White Label Marketing Tools for Agencies: Our 10 Best Picks
- Technology22 hours ago
Virtual Reality Exhibit Carne Y Arena: The Refugees’ Plight
- Technology15 hours ago
Best Workflow Mapping Tools for Smarter Business Processes
- Technology23 hours ago
Top 10 Podcast Editing Software Applications for Beginners
- Lifestyle6 hours ago
Should I Buy an Electric Scooter? What You Can Learn